Sunday, June 30, 2013

Cadance's Christening Gown


I made this Christening gown using McCall's Pattern 3063 for my granddaughter, Cadance.  I enjoyed sewing this so much for her.  I made the blanket using the shawl from her mommy's wedding gown as shown in the photo below.  I had purchased extra fabric for the blanket out of the same fabric I chose for the Christening gown.   I folded the shawl into a rectangle. I then cut a rectangle for the blanket to match the size of the folded shawl adding 1/2 an inch around the edge of the fabric rectangle for the hem.  I folded the edges of the fabric twice creating a 1/4 inch hem.  Press in place.  You can machine or hand stitch the hem in place.  I placed the shawl and blanket with their wrong sides together.  Doing a slip stitch around the entire blanket with a very fine fishing line type thread makes the blanket look nice.  You can then cut the fine line later to remove the shawl from the fabric if desired. 


Christening Gown from McCalls Pattern 3063.  Blanket is the shawl from her mommy's wedding gown.


Gown with matching bonnet and bib.  


McCalls Pattern 3063


Maggie Sottero gown with shawl.  Photo Greg Johnson Photography. 

Baby's Christening Gown with Blanket made
from her Mommy's Wedding Gown Shawl.
Gown ~ Maggie Sottero
Wedding Photographer ~ Greg Johnson


Friday, May 3, 2013

Saturday, April 20, 2013

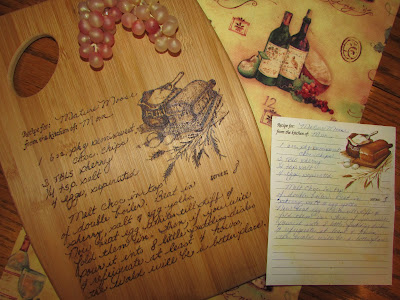
DIY Cutting Board with Mom's Recipe

DIY Cutting Board with Mom's Recipe

This was a lot of fun to make!  It's much easier than I thought.  I purchased a bamboo cutting board at Wal-mart along with the wood burning tool set below.  It was in the craft department of Wal-mart.


I used the tip that was similar to a felt tip pen.  It worked on the bamboo the best for me.  You can experiment with the tip that works best for you.  This tool was comfortable to use.  

The first thing I did was scan my mom's recipe into my computer.  I then opened it in a program that made it larger.  I wanted it to fill up most of the cutting board.  I printed off the recipe.  Next, I placed a piece of carbon paper over the board and then centered the recipe onto the board.  It's easier to center if you cut away most of the paper around your recipe.  I traced the handwriting with one of those mechanical pencils.  I liked the very fine point for the tracing.  That way you can get the handwriting as close to the original.   

I then heated the iron up and began "writing" with it.  I used it like a pen or pencil and found it quite easy to fill in as shown in the image of the bread, flour and eggs.  If you can color in a coloring book, you can do this.  The bamboo is fairly forgiving and I just began coloring and it was so easy!  For the darker areas of shading, I went over a few times pressing a little harder until the desired effect was achievedI tried the very fine point from the tool kit and found it would take me forever, so I gave the "felt tip" type point a try and it worked perfect.  I was still able to achieve the fine lines.  This was on the bamboo.  I haven't tried using the tool on the other types of wood cutting boards.  Like the instructions say on the tool package, don't squeeze the tool too hard while working or you'll burn your fingers!  Very true!  Just relax and take your time and it won't burn.  Have fun!


Here are two I made for my mother-in-law to give to my brother and sister-in-law.  These are fun to make.  

After our move into a new home, I found this oak cutting board I had from way back in one of the older packed boxes.  I thought I could burn sunflowers onto the board for my daughter.  She loves sunflowers.  : )  The wood was easy to work with the burning.  I found this lovely wallpaper border print online and did the same where I used carbon paper to trace the image onto the board.  


Here's a fun idea where you can use an image from a wedding invitation to make a wonderful gift for the bride and groom.  I did this one the same as above by scanning the monogram band you see around the invitation into my computer and printing off the size I needed to fill the bottom of the cutting board.  You can get these bamboo cutting boards at Walmart.  

Friday, April 19, 2013

Barbie Wedding Gown


Barbie Wedding Gown

Here is a wedding gown I made for my granddaughter, Cadance.  She has a Ken doll who wears a tux and she asked Nana if I would make her a gown. 

You can get the pattern for the gown at the following link:

https://sites.google.com/s/1KXHUTF4J-8G2ZCu-d9MCBHfG4AjQ8MkY/p/1GEBd_Oh3I_SZJ9t5gjFy1hkMWXgdK38W/edit


Items Needed:

Satin Fabric 1/4 of a yard
Sheer Fabric as shown in photo 1/4 of a yard
Thread to match
Desired Lace Trims
Velcro

There are two downloads.  One is the bodice patterns and the other is the skirt pattern.  Be sure to print each of the two downloads at 100% for the correct size.  The pattern pieces are pretty self explanatory if you have sewn 11 1/2" doll patterns before.  You'll want to start by making the darts in both the front and back bodices. Next, sew the front and back bodices together with right sides together.  All seams and hems are 1/4 inch.  Make the hem at the top of the bodice front and back.  Sew the trim(s) at the top of the front bodice.  Set aside.   You can leave out the trim on the under skirt of the gown if you prefer.  If you do add a trim, be sure to hem the under skirt with a width that will allow the trim to match the hem length on the over skirt.  Next, add the trim to the under skirt hem.  Hem the over skirt too.  Sew the over skirt to the under skirt at the top of the waist line.  Gather that top edge by basting.  Pull threads to gather and pin to the entire front and back bodice matching edges.  Sew in place.  You will now have a facing at the back of the two sides of the bodice and the back of the skirt.  Press them down to the inside of the gown with your iron.  Sew the raw edge down.  I cut a 1/4" width of the Velcro with the length to match the length of the opening on the back of the gown.  Pull the Velcro apart.  Place the top piece of Velcro under the left edge of the opening on the gown.  Press down the entire length.  Do the same for the bottom piece of the Velcro pressing it down on the top of the right edge opening.  The gown is now ready for Barbie's special day.  


The bouquet was made with the glue and bread dough, a small Styrofoam ball, ribbons and rhinestones.  I used jewelry wire made into a small loop about a half inch long and hot glued its ends into the Styrofoam ball.  A piece of 1/8" elastic was looped through the wire loop and hot glued together at the ends to form a bracelet for Barbie.  I cut off the extra length.  This way you can put her hand through the elastic bracelet and let her fingers go through the wire loop for holding the bouquet. 


To make the glue and bread dough, take a slice of white bread, (don't use wheat) remove the crusts.  Tear the bread into 1 inch pieces.  In a small bowl, pour about 1 tbls of Elmer's Glue and add the bread pieces.  Knead the dough until it is smooth and like dough.  You may need to add more glue if necessary.  After you have kneaded it, you can split the dough into separate dough balls.  Add food color.  Green for the leaves and I left the other dough ball white for the roses.  You can add whatever color you'd like.  To make a rose, tear off a tiny amount of the dough from the ball and roll into a tiny ball.  Shape into an oblong ball.  Next, tear off a tiny amount again and flatten the dough to as thin as you can without tearing.  Wrap that piece round the oblong ball to resemble a bud.  You can leave it as a bud or you can add more flatten pieces of dough around each "petal" to make your desired rose size.  When you have your desired size rose, pinch off the bottom with your fingernail to make a flat bottom for gluing.  Set aside each rose for drying.  For the leaves, tear off a tiny piece again and flatten the dough.  Shape into a leaf by pinching each end.  I let them dry overnight and then hot glued the roses, leaves and rhinestones to the Styrofoam ball.  


I then used a 1/2 inch wide sheer ribbon as shown around the bottom of the bouquet.  I made a basting stitch at the bottom of one edge of the ribbon to gather and then hot glued it around the bottom of the bouquet.  Next, I added 1/8" wide satin ribbon in colors to match the wedding colors.  Each ribbon was cut to 2 inches in length.   I hot glued them to the back of the bouquet behind the sheer ribbon.  I made a tiny bow and glued it over the glued ends of ribbons.  If desired, press the sticky side of the rhinestones into the bottom of the ribbons as shown.   


Tuesday, March 5, 2013

DIY Lego Head Container

DIY Lego Head Container

I used the Argo Corn Starch container to make a Lego head for my grandkids.  I removed the label and then washed and dried the empty container.   I drew on the face with a Sharpie pen and that was it. 

Saturday, March 2, 2013

Ninjago Lloyd Costume


Here's my grandson, Bradyn in his Ninjago Lloyd costume I made him for Christmas.  He was pretty happy with his costume!  Fun!


Ninjago Lloyd Cape

Ninjago Lloyd Cape

My grandson, Bradyn is a big fan of Lego Ninjago Lloyd.  He asked me if I could make him this cape.  He went into detail as to how he would like it.  So, of course, Nana got busy.  I'd like to share the pattern with you.  It was pretty easy to make if you've sewn before.  I purchased a child's cape pattern and used that for the cape and for Lloyd's head, I drew up the design that you will find below these instructions. 


To copy Lloyd's head to your computer, right click on the design and click on, "save image as".  A window will open and there you can choose where to save this design.  Click on, "save" and you will now have the design to print from your computer.  When you want to print the design, double click on the thumbnail image of the design in your file where you saved it to.  It should open to a large window for you and up at the top, you should be able to see where you can print the image.  Make sure the image fills most of the 8.5" x 11" paper you have in your printer.  This is for Windows 7.  I hope it will work for you on your computer.


I purchased the required amount of fabric suggested on the cape pattern of the yellow fabric.  I then got 1/8 of a yard of the black and white fabric and 3/4 of a yard of the green. I usually get a little extra fabric for boo boos so you may want to get less as you will be able to tell from the size of the Lloyd design how much fabric you'll need.  You will need to get the heavy fusible interfacing for the Lloyd face design.  The weight of the interfacing is whatever you feel comfortable using.  You'll also need matching thread for each fabric.


To start, I cut out the cape according to the instructions on the purchased cape pattern from the yellow fabric.  Next, I printed off two copies of the Lloyd head design.  One is for cutting and the other is to help you with showing you how the face and eyes fit on the green hood.  You will be using one copy for cutting all the pieces out from the hood and face.  Do so by cutting the hood first and pin it to the green fabric and the interfacing.  Now cut your fabric and interfacing around the hood paper pattern.


Next, cut out the section of the face to be done in yellow from that same copy.  Using any scrap piece of yellow you had left over from the cape fabric, pin the face pattern to the yellow fabric and interfacing.  Cut your fabric and interfacing around the face paper pattern.


The pattern piece below of the Lego Ninjago Lloyd is not to be used commercially or sold.  For personal use only. 
   

Thursday, January 31, 2013

BBQ Cheeseburger Meatloaf


This is really good.  Hope you enjoy it!


BBQ Cheeseburger Meatloaf

1 pound of 98% lean ground beef or turkey
Cooking Spray
1 egg, slightly beaten
1 cup of soft bread crumbs
1 tsp seasoned salt
1/2 tsp dry mustard
1 Tbls Worcestershire Sauce
1/3 cup finely chopped onion
2 slices of sharp cheddar cheese or American cheese
2/3 cup of favorite BBQ Sauce
1 Tbls ketchup
1 Tbls brown sugar
1 Tbls vinegar
1 tsp Worcestershire Sauce


Preheat the oven to 350 degrees.

Combine the beef through the onion in a large bowl.  Mix well.  Place half of

the beef mixture into a loaf pan sprayed with cooking spray.  Place the cheese

side by side over the beef mixture.  Add the remaining mixture over the top of

the cheese slices. 

In a small bowl, mix the remaining ingredients and pour over the top of the

meatloaf.  Bake for 45 minutes or until done. 

Wednesday, January 30, 2013

SUV Play Pouch


SUV Play Pouch with Pen Pouch


I saw a photo of this idea on Pinterest but I could not find the instructions on how to make it so I made this one today. I will share with you my experience in putting one together. For those of you who are expert seamstresses, please feel free to correct or comment on my work. Thank you! I appreciate any help. I used scrap material and will give you the approximate measurements I used for the pouch. Here are the materials you will need.


Background (owl) Fabric 5/8 of a yard of the 44 to 45 inch wide fabric


Pink Fabric 5/8 of a yard of the 44 to 45 inch wide fabric


Polka Dot Fabric 5/8 of a yard of the 44 to 45 inch wide fabric


Threads to match


Gross Grain Ribbon in desired color 1 1/4 yard


First, cut a 4" strip off the right edge of the fabric giving you the 18 1/2" wide fabric for the background of your pouch. The strip will be used for your pen pouch.


Fold the fabric lengthwise in half with the right sides together as shown above. Sew a 3/8" seam (all seams are 3/8") along the long edge and one end of the fabric piece.


Cut the corner where the seam line meets as shown above.


Turn your pouch to the right side. Use a chop stick to push out the corners and press with your iron. Create a seam at the open end by turning in a 3/8" hem to the inside as shown above. Press.


Now slip stitch the seam with an invisible stitch. Below is a great tutorial on how to do that. Just copy and paste the following link into your search engine and follow their instructions.


http://quilttaffy.blogspot.com/2008/07/invisible-closing-seam-tutorial.html


Your pouch should now be about 8 3/4" wide. If you would like a pouch a little wider than that, use 3/4 of a yard of fabric and you can adjust from there.


For your first two pockets, cut 2 panels 9 1/2" x 17" out of the polka dot fabric or your choice of fabric. For each of the pouch pockets, fold in half to make the pocket 9 1/2" x 8 1/2" press and sew each pocket the same way you did with the background (owl) fabric. I didn't do the invisible stitch on the open end of the pockets but pressed them inside 3/8" before laying them onto the background fabric piece. Lay each pocket onto the background (owl) fabric piece with one on one end of your background fabric piece and the other at the other end as shown above. Pin into place with the pressed/folded end at the top. Top stitch the sides and bottom leaving the pressed/folded end open. You will be stitching over the one side that was open for turning so make sure your ends are folded to the inside 3/8" before stitching. Top stitch again over your first stitching to reinforce the pocket.


For the pink fabric pockets, do the same as above and place them just above your first polka dot fabric pockets. Remember to top stitch your pockets twice. For the top or last pockets, cut the polka dot fabric into two 7" x 9 1/2" pieces. Fold, press, pin and sew both pockets the same as the others as shown above. These size pockets work well with my grandson, Bradyn's Lego figures which he likes to take with him everywhere.


Pen and Pencil Pouch


Cut one piece of the pink fabric 17" x 3 3/4". Cut one piece of the background (owl) fabric 15 1/2" long. Fold the background (owl) fabric in half and press with your iron. Lay the background fabric on top of the pink fabric with the folded edge at the middle of the pink fabric as shown above. The extra pink fabric running to the left will be the back of the Pen Pouch.


Sew a running stitch down the middle of the top (owl) fabric as shown above. This will create two pockets for the pens and pencils. Sew another stitch on top of the first stitching.


For the "hanger," cut a piece of the background (owl) fabric 6" x 3". Fold in half lengthwise. Press.


Sew the side and turn out to where the right side of fabric is showing. Press.


Fold the "hanger" in half as show above and lay it on the pocket owl fabric as shown.


Now, fold the pink fabric down over the top of the pocket as shown above. Sew a seam on each side leaving the bottom of the piece open for turning. Trim off the edge of the "hanger" at the side seam. Turn to where the right side is showing and press. Press the bottom edge inside 3/8" and slip stitch that end closed.


Turn your pouch over and lay the ribbon in the center of the piece as shown above. Sew the ribbon down on both sides of the ribbon to the pouch.


Turn your pouch over again and bring one side of the ribbon over the middle and sew in place as shown above. Slip the Pen and Pencil Pouch into the ribbon and tie into a bow. You can insert one end of the Play Pouch under the head rest in one of the middle seats in your SUV to where the other side of the pockets hangs to the back seat for play back there. Below is the photo again so you can see how it sets.


If you would like to leave off the Pen and Pencil Pouch, you can do so by omitting the ribbon and not making the Pen and Pencil Pouch. Now your kids will be able to find their toys while traveling in the car. Hopefully.


Monday, January 21, 2013

Miracle Whip Ham Casserole


 A big favorite at our house.  If you like Miracle Whip, you'll love this one.  Enjoy!


Miracle Whip Ham Casserole

1 cup of Miracle Whip (You may want to add more Miracle Whip if desired.  You want your pasta to be creamy.)
2 cups of frozen or fresh broccoli, thawed or cooked, drain
2 cups of shredded cheddar cheese
2 cups of cooked diced ham or chicken
2 cups of cooked corkscrew noodles, drained
1/2 cup of milk
1 1/2 cups of seasoned croutons

In a 9 x 13 pan, combine all ingredients except 1/2 cup of cheese and 1/2 cup

of croutons.  Stir well.  Top with remaining cheese and croutons.  Bake at 350

degrees for 30 minutes. 

Snowflakes


Joys of Nature

Photo January 21, 2013 taken on our deck rail.

Tuesday, January 1, 2013

Ways to Use Medicine Bottles

Child's Play Food Cans 

If you're like us and really hate to throw these empty medicine bottles away, then let's have fun creating a toy idea for your kids or grandkids.  My grandchildren, Bradyn and Cadance along with myself,  love to play grocery store when they come to visit.  I searched on the Net for different canned food labels and found several as shown in the photos below.  Then I used my Print Shop program on the computer to size them and then print them off.  I cut the labels to fit each of the two sized bottles I had. 

I wrapped the label around the bottle to fit and used the packing tape to hold in place by wrapping the tape all the way around the label.  I noticed I had some extra space at the bottom of the bottle and so I used some wide Scotch tape I had to finish. 

I then painted the tops with some grey acrylic paint and Wa La!  We now have canned goods to go with our other shopping items.  For added fun, I printed off photos of the foods to match the contents in the "cans" and cut them to fit inside the bottles.  You can search for those on the Net too.  I then used the clear sticky tabs you can find at any craft or scrapbook store to attach the photo to the bottom of the bottle.