Sunday, December 18, 2016

Cross Stitch Christmas Village Wreath

Cross Stitch Christmas Village Wreath
Cross stitch houses made by Celia Avery

 I was inspired to make this wreath by the lovely wreaths made with the Christmas village houses over on Pinterest.  This was a lot of fun to put together.  The cross stitched houses were made by my mom, Celia Avery, quite a few years ago.  I love displaying them on this wreath. 


Sunday, November 13, 2016

Thursday, September 29, 2016

Sunday, July 24, 2016

Sewing Chair Make Over

Grandma's Sewing Chair make over using the chalk paint from Waverly.  I used the cream color Plaster and the blue color Ocean which you can purchase at Walmart in their craft section.  I love the beach chair look.


Here is the chair before.  All I had to do was wash the chair down with a mild soap and let it dry thoroughly.


The chalk paint is great in that it covers so well.  I didn't have to remove the old varnish at all.  The chair was painted first, then sanded.  I finished using the Waverly clear and antique waxes.  The chair goes great in our beach family room.  Very happy with the results.  A big thank you goes out to our daughter, Kristen for her painting ideas!

Thursday, May 5, 2016

Ninjago Masters of Spinjitzu Game

Ninjago Masters of Spinjitzu Game 


 Ninjago Masters of Spinjitzu Game
By Bradyn Roebuck

My grandson, Bradyn, came up with this game for his Lego Ninjago action figures.  I helped him with the design but the concept, game rules and idea was his.  We've played it several times and it is fun.  Bradyn and I hope you will enjoy it.  For the markers, Bradyn used his Lego action figures along with their weapons as seen in the above photos.  If you want, you can use the cut outs which I will provide in the link below.

To obtain your pages.  Click on the following link:

https://sites.google.com/site/dianaleeshares/system/app/pages/search?scope=search-site&q=game  


If you need to, ask an adult for help putting the game together. You will need white card stock for printing the game board, tokens and spinner.  Make sure you have your printer set to print on portrait not landscape.

Once you arrive at this link, click on the first page.  It will open to show the page as a pdf file.  Please wait while it opens.  At the top left side of your screen, click on file.  Click on print.  You will need to print at 100% to get the correct size.  You will need to print all 8 pages.


1.  Print off all the pages onto white card stock paper.  If you want, you can laminate each page for better playing.  Do not laminate the blue and green pages of the spinner.

2.  Cut out each of the round tokens of each of the Lego Ninjago warriors.   Now cut out the weapons from the weapon page.  I wasn't sure which weapons were whose so I added all I could find on the Internet.

3.  To make your spinner, cut out the small green circle with the arrow in one of the triangle spaces.  Do Not cut out the large blue circle with the numbers.   Glue the green piece to a used CD or DVD disc you no longer want or were planning to throw away.  Next, using a paper clip, open the clip up.  Place the green disc over the blue circle page with the numbers.  Push the paper clip through the center.  Open the second paper clip and do the same by pushing it through the center.  Press each end down to both sides of the disc and blue circle paper as shown below.  If you need to, poke a starter hole in the center with a sharp point.

Bradyn uses his Lego Ninjago figures for the game but if you prefer, you can use the cut outs provided from the above link.  Follow the instructions on the pages for putting your figures together.  It doesn't matter which Lego Ninjago figures you use or how many for your game as long as you have the same amount for good and evil figures.  Okay, I think you're ready to go.  Once you have your tokens, weapons and figures cut out, put together and your spinner made, you're ready to play.  Have fun!


Sunday, March 6, 2016

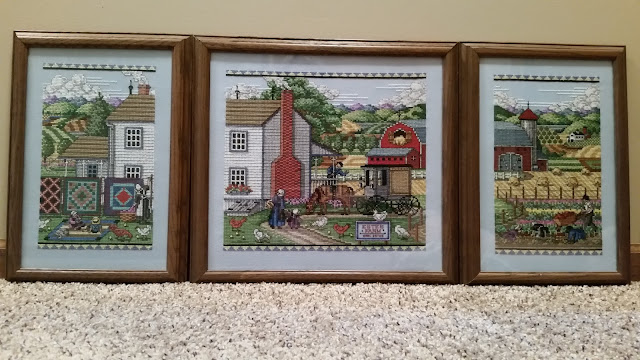
Estes Farm Cross Stitch Piece


The original design for this piece comes from the Cross Stitch and Country Crafts magazine in 1987. It ran over three issues from May of 1987 to October of 1987.  It is from the magazine's Collector's Series and while the article does state the design for this piece was inspired by artist, Charles Wysocki, it does not tell us who the cross stitch piece(s) designer was.  If you know who the designer is, please let me know in a comment below to give them the recognition they deserve.  Thank you!


I changed the name of the farm to Estes Farm in honor of my husband's family on his mother's side.   He grew up working on the Estes farm until he went off to college.


Sunday, February 14, 2016

An Heirloom Wedding Cross Stitch Sampler


An Heirloom Wedding Sampler

I cross stitched this design for my daughter and son-in-law on their wedding in 2004.  The original design was featured in Cross Stitch & Country Crafts magazine, May/June 1986.  I changed the ribbon and hearts border to the maple leaf and ecru cross which matched the theme of their wedding.  The colors were changed a bit too.  I do apologize as I have no idea who the original designer of this beautiful cross stitch pattern is.  If you know the designer's name, please let me know in a comment below so we may give them credit.  Thank you!

 Original design featured in Cross Stitch & Country Crafts May/June 1986

Thursday, January 7, 2016

DIY 18" Doll Play Bath Bubbles


DIY 18" Doll Play Bath Bubbles


Have fun making your own toy bath bubbles for the 18" doll's bathtub.  I purchased the clear plastic ornament balls and the Delta Creative brand acrylic paint in the Creamcoat color Hydrangea Pink found at Hobby Lobby.  You can use whatever color you desire. 


 I chose 4 of the small balls and 1 of the larger ball.  First, remove the tops off the plastic ball ornaments.  You can discard them or save them for another project if you desire.
 

Then pour about 2 teaspoons of paint into the opening of one of the clear ornament balls.  Next, add about 1 teaspoon of water into the same ornament ball.  I didn't measure exact. You can add a little more if you would like. Cover the opening to the ornament ball with the palm of your hand.  Using both hands, shake well until the entire inside of the ornament ball is coated.  If your paint is too thick, add a little more water.  The paint should be fairly thin.  Then pour the remaining amount of paint/water mixture into the next ornament ball.  Repeat the same with each of the ornament balls.  You can add more paint and water if needed as you go. 


  Lay the ornament balls down onto an old rag that you wouldn't mind if any paint gets on it.  Let them dry overnight.  Turn the balls over and let them dry thoroughly.  I used hot glue to hold them together, but you can keep them apart if you would want. After the balls are dry, you will notice some streaking of the paint and that's okay.  Bubbles can have a swirled effect to them.  If you prefer a more opaque look, repeat the process until you achieve the desired look.